Crawl space encapsulation transforms wet, moldy spaces beneath Pacific Northwest homes into controlled, dry environments that protect structural integrity and indoor air quality for decades. This comprehensive moisture control system addresses all water sources simultaneously—vapor intrusion from soil releasing 10-15 gallons daily, groundwater under hydrostatic pressure from saturated clay, surface water from 150+ rainy days annually, ambient humidity from marine air at 65-75%, and condensation on cold surfaces—providing permanent protection against Seattle and Portland's relentless precipitation.
Professional encapsulation costs $3,000-$7,000 for typical 1,000 square foot crawl spaces in Washington and Oregon, with installations including commercial-grade vapor barriers, foundation wall insulation, complete air sealing, and mechanical dehumidification. Systems requiring drainage add $2,500-$4,000 for perimeter drains, sump pumps, and battery backup. This investment prevents wood rot requiring $6,000-$15,000 in floor joist replacement, foundation damage costing $8,000-$25,000 to repair, and recurring mold remediation expenses of $2,000-$5,000 every few years.
Homes in Seattle, Portland, and throughout the Pacific Northwest built before 1990 typically lack adequate moisture protection—approximately 80% experience crawl space problems during ownership. If your home shows signs of moisture damage including musty odors, sagging floors, or visible mold, call certified specialists at (877) 360-5502 for comprehensive assessment and permanent solutions designed for Pacific Northwest conditions.
What Is Crawl Space Encapsulation?
Crawl space encapsulation seals the space from external moisture using commercial-grade vapor barriers, mechanical dehumidification, thermal insulation, and complete air sealing to create integrated moisture control systems. Unlike patchwork solutions addressing single issues—installing sump pumps to remove standing water or spreading plastic sheets over exposed soil—encapsulation addresses all moisture sources where components function together maintaining dry conditions regardless of external weather and soil saturation.
The encapsulation concept originated from building science research demonstrating that crawl spaces in humid climates perform better when treated as conditioned semi-interior spaces rather than ventilated semi-exterior spaces. Research by Advanced Energy in North Carolina and building science studies conducted by Oak Ridge National Laboratory established that sealed crawl spaces with dehumidification maintain lower humidity, experience less mold growth, reduce heating and cooling costs by 15-18%, and improve indoor air quality compared to traditionally vented designs.
These findings apply directly to Pacific Northwest conditions despite different climate characteristics. While southeastern states experience hot, humid summers, the Pacific Northwest maintains moderate temperatures with persistent humidity year-round. Both climates share the critical factor—ambient outdoor air humidity frequently exceeds crawl space air humidity, making ventilation counterproductive. The 2015 International Residential Code recognizes this research, allowing sealed crawl spaces as code-compliant alternatives to vented designs when proper moisture control components are installed.
How Encapsulation Differs from Basic Vapor Barriers
Basic vapor barriers cover crawl space floors with 6-10 mil polyethylene plastic preventing soil moisture evaporation—addressing only one moisture source among several affecting Pacific Northwest crawl spaces. Installation typically involves rolling out plastic sheets with overlapped seams weighted with rocks or stapled to walls. Crawl space vents, doors, and openings remain as originally constructed with no insulation, dehumidification, or drainage systems.
This approach reduces total moisture load by approximately 30-40% in typical Pacific Northwest crawl spaces—insufficient for preventing mold growth when other sources contribute 60-70% of moisture. Basic barriers address soil vapor transmission while leaving ambient humidity from marine air, groundwater intrusion, condensation, and surface water completely unaddressed. The EPA establishes 60% relative humidity as the maximum level for preventing mold growth—crawl spaces with basic barriers alone in Pacific Northwest conditions commonly maintain 65-70% humidity, above the threshold supporting mold colonization.
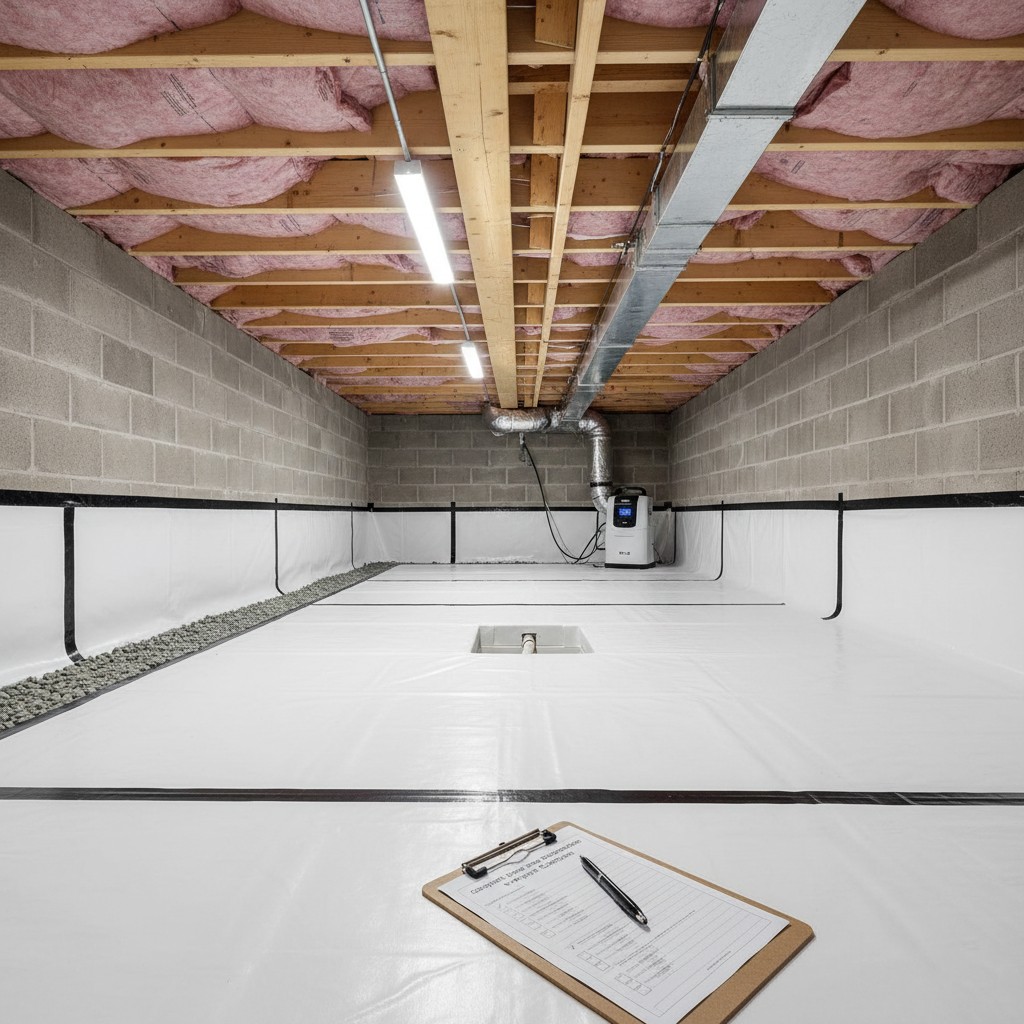
Comprehensive encapsulation creates sealed systems where commercial-grade 10-20 mil reinforced vapor barriers cover floors and extend up foundation walls with all seams sealed using specialized tape, complete sealing of all vents and air infiltration points prevents humid Pacific Northwest marine air entry, foundation wall insulation creates thermal barriers preventing condensation on cold concrete, commercial crawl space dehumidifiers maintain 45-55% humidity addressing residual moisture, drainage systems remove groundwater before it enters spaces, and air sealing at rim joists and penetrations reduces infiltration throughout homes.
This integrated approach reduces crawl space humidity to 45-55%—well below the 60% mold growth threshold with substantial safety margin. Effectiveness rates show basic vapor barriers prevent mold in 40-60% of Pacific Northwest installations while comprehensive encapsulation prevents mold in 95-100% of properly designed and maintained systems.
Professional Encapsulation System Components
Quality encapsulation requires specific materials and installation methods proven effective in Pacific Northwest's severe moisture conditions. Each component serves distinct functions while working synergistically with other elements creating comprehensive moisture control.
Commercial-Grade Vapor Barrier
Premium encapsulation uses 10-20 mil reinforced polyethylene specifically manufactured for crawl space applications—2-4 times thicker than standard 6 mil construction plastic. Reinforcement layers within the material prevent tears from normal foot traffic during inspections and maintenance while providing puncture resistance from sharp rocks or debris underneath. The material must meet ASTM E1745 standards for vapor barrier performance, establishing maximum water vapor transmission rates of 0.1 perms—essentially impermeable to moisture.
Professional installation requires 100% soil floor coverage with no gaps, exposed areas, or shortcuts around obstacles. Every square inch of soil must be covered because leaving even small areas exposed allows substantial moisture transmission—a 10 square foot exposed section releases approximately one gallon of water vapor daily. The barrier extends 12-18 inches up foundation walls with mechanical attachment using fasteners and termination bar rather than tape alone, which fails within 2-3 years in crawl space humidity. Wall coverage prevents moisture wicking through the concrete-to-barrier interface and provides positive attachment resisting displacement.
All seams require sealing with specialized 4-inch butyl or acrylic seam tape rated for crawl space conditions. Standard duct tape fails within 2-3 years as adhesives break down in high humidity—proper seam tape maintains adhesion for decades creating vapor-impermeable seams at overlaps. The International Residential Code requires minimum 6-inch overlaps at all seams with proper sealing to meet code requirements for sealed crawl space designs.
Complete sealing around all piers, posts, and obstacles uses custom-cut barrier sections with sealed penetrations at these locations. These detail areas commonly get shortcut during installation but represent significant vapor transmission points if improperly sealed. Sealing around utility penetrations—plumbing pipes, electrical conduits, HVAC ducts—uses compatible sealants that remain flexible and maintain adhesion as materials expand and contract with temperature changes throughout seasons.
Foundation Wall Insulation
Closed-cell spray foam or rigid foam board applied directly to foundation walls serves dual purposes—creating thermal barriers preventing condensation on cool concrete surfaces and reducing heat loss through foundations improving energy efficiency. The insulation location proves critical—walls rather than floor joists—because this brings crawl spaces within homes' thermal envelopes maintaining temperatures closer to living space temperatures.
Insulation must achieve R-10 to R-15 values typical for Washington and Oregon climate zones per International Energy Conservation Code recommendations. This insulation level prevents foundation walls from dropping below dew point temperature even when crawl space air humidity reaches 60%—eliminating condensation that would otherwise drip onto vapor barriers and surrounding materials. At 60% relative humidity, dew point temperature is approximately 55°F—uninsulated concrete walls commonly reach 50-55°F during winter, causing condensation when humid air contacts these cold surfaces.
Closed-cell spray foam provides superior performance compared to rigid foam board because it simultaneously insulates and air-seals, filling all gaps and cracks in foundation walls. The material expands to fill voids creating continuous thermal barriers without gaps where air could infiltrate. Spray foam achieves R-6 to R-7 per inch—2-3 inches provides R-12 to R-21 insulation exceeding code minimums. The closed-cell structure resists moisture absorption and won't support mold growth even if surface moisture occurs.
Rigid foam board requires careful cutting, fitting, and separate air sealing of all joints and edges to achieve similar performance. Board insulation costs less than spray foam but requires more labor for proper installation. Gaps at joints and edges must be sealed using compatible foam sealant or tape—any unsealed areas create thermal bypasses reducing overall effectiveness and allowing air infiltration.
Homeowners typically report 5-8°F warmer floor temperatures in winter following wall insulation installation—an immediately noticeable improvement. Families report no longer needing slippers on main floors and children playing comfortably on floors previously too cold. Energy savings of $200-500 annually for typical 1,500-2,000 square foot homes result from reduced heat loss through floors and improved HVAC efficiency.
Commercial Crawl Space Dehumidifier
Standard basement dehumidifiers fail in crawl space applications due to insufficient capacity for space volumes, lack of proper drainage, and inability to operate in cooler temperatures common in crawl spaces during winter months. Commercial crawl space dehumidifiers provide purpose-designed features addressing these limitations.
Proper capacity sizing based on crawl space cubic footage and expected moisture load proves essential. Typical residential crawl spaces require 70-90 pint daily capacity compared to 30-50 pints adequate for basement applications. The Association of Home Appliance Manufacturers recommends 10-12 pints of daily capacity per 500 square feet of crawl space in humid climates—a 1,000 square foot crawl space requires 80-100 pint capacity accounting for Pacific Northwest's elevated humidity and persistent moisture sources.
Self-draining operation with condensate pumps eliminates manual bucket emptying allowing continuous operation without homeowner intervention. Units connect to floor drains, sump pump basins, or exterior discharge lines removing collected water automatically. Dehumidifiers operating in Pacific Northwest conditions commonly collect 5-10 gallons daily during wet season—manual emptying would require daily intervention making the system impractical.
Operation in cooler temperatures down to 40-45°F compared to 65°F minimums for standard units allows year-round function. Crawl spaces commonly reach 45-55°F during winter months when dehumidification remains necessary despite cooler temperatures. Standard dehumidifiers shut down when temperatures drop below 65°F as coils freeze—commercial units use hot gas defrost or other technologies maintaining operation at lower temperatures.
Digital controls maintain target humidity levels automatically with typical settings of 45-55% for optimal mold prevention while avoiding excessive drying that wastes energy. Quality units include hygrometer sensors continuously monitoring humidity and cycling compressors on and off maintaining set points. Remote displays mounted in living spaces or smartphone connectivity provide ongoing humidity monitoring without entering crawl spaces.
Energy efficiency ratings minimize operating costs—quality units consume $15-30 monthly in electricity compared to $40-60 for less efficient models. Given year-round operation requirements in Pacific Northwest climates where humidity remains elevated even during summer, efficiency significantly impacts lifetime operating costs. ENERGY STAR certified models use approximately 15% less energy than standard models while providing equivalent moisture removal.
Complete Air Sealing System
Every potential air entry point must be sealed preventing humid Pacific Northwest air from entering crawl spaces where it condenses and maintains high humidity despite other moisture control measures. Air sealing proves as critical as vapor barriers because air infiltration can introduce more moisture than vapor transmission through exposed soil.
Foundation vents receive permanent sealing with insulated covers rather than seasonal vent closing. Research demonstrates that opening vents during summer months—common advice in older building practices—introduces humid air causing more moisture problems than benefits provided in Pacific Northwest marine climate. Advanced Energy research compared vented versus sealed crawl spaces in humid climates, finding that vented designs maintained 15-25% higher humidity levels and experienced 3-4 times more mold growth than sealed designs.
Access doors require replacement with insulated, gasketed units providing airtight seals when closed. Original crawl space doors commonly feature gaps totaling several square inches allowing substantial air infiltration—the equivalent of leaving a window partially open year-round. Commercial crawl space doors include compression gaskets creating positive seals when closed, insulated panels providing thermal breaks, and secure latching mechanisms maintaining consistent closure.
Sill plates where wooden structures rest on concrete foundations require complete sealing using foam sealant or gaskets. This junction commonly features gaps and cracks allowing significant air infiltration as concrete and wood rarely form perfect contact. Sealing this interface provides substantial air leakage reduction improving both moisture control and energy efficiency.
Rim joist areas where floor systems rest on foundations receive spray foam application sealing the band joist cavity. This area represents one of the largest air leakage sites in homes with open cavities connecting crawl spaces directly to wall cavities and sometimes to living spaces. Proper rim joist sealing commonly reduces whole-house air infiltration by 10-20% based on blower door testing before and after sealing.
All penetrations where pipes, wires, ducts, or other utilities pass between crawl spaces and exterior or living spaces require sealing with compatible materials. Plumbing penetrations commonly feature large gaps around small pipes—a 3-inch hole around a 1-inch pipe creates substantial air leakage. Compatible sealants include expanding foam for large gaps, silicone or polyurethane caulk for smaller gaps, and specialized pipe boots or collars for plumbing penetrations.
Drainage Systems for Groundwater Control
Properties experiencing groundwater intrusion require drainage systems removing water before it enters crawl spaces or accumulates on vapor barriers. Necessity depends on site-specific conditions including water table depth, soil type, precipitation levels, and topography. Professional moisture assessment during wet season determines whether drainage proves necessary—many properties require drainage while others achieve adequate moisture control through vapor barriers, sealing, and dehumidification alone.
Interior perimeter drains use 4-inch perforated pipe installed along foundation interior perimeter collecting groundwater before it rises into crawl spaces. The pipe rests in gravel beds promoting water flow toward collection points while filtering soil particles that would clog perforations. Proper installation includes appropriate slope of minimum 1/8 inch per foot ensuring gravity drainage to sump basins—inadequate slope causes water ponding in pipes reducing effectiveness.
Sump pump basins of 18-24 inch diameter collect water from drainage pipes providing reservoirs for pump operation and allowing sediment settling preventing pump damage. Basin sizing must accommodate expected flow rates—undersized basins cause frequent pump cycling reducing equipment lifespan and creating noise disturbance. During peak groundwater intrusion, flow rates can reach 5-10 gallons per minute requiring adequate basin volume for pump intervals.
Primary sump pumps using submersible designs (typically 1/3 to 1/2 horsepower for residential applications) automatically remove water when basins fill to trigger levels. Quality pumps include cast iron construction providing durability and heat dissipation, thermal overload protection preventing motor damage, and vertical float switches providing reliable triggering without interference from basin walls. Discharge capacity must exceed expected inflow rates during peak precipitation preventing basin overflow.
Battery backup pumps operating on battery power during power outages ensure continued water removal when primary pumps cannot operate. Pacific Northwest winter storms commonly cause power outages lasting hours to days—precisely when groundwater intrusion peaks. Battery systems include marine deep-cycle batteries providing sustained power for multiple pump cycles, charging systems maintaining readiness, and alarm systems alerting homeowners to primary pump failures requiring attention.
Discharge lines carry water from sump pumps to exterior discharge points minimum 10-20 feet from foundations preventing removed water from re-entering crawl spaces through soil. Lines must include check valves preventing backflow when pumps shut off, proper slope preventing freezing in unheated portions, and discharge to appropriate locations—not neighboring properties, septic drain fields, or areas where water would create problems.
The Professional Encapsulation Process
Understanding the installation process helps homeowners prepare for projects and recognize quality workmanship. Professional encapsulation follows established sequences ensuring each component integrates properly with others.
Initial Assessment and Preparation (Day 1)
Professional moisture assessment uses calibrated equipment identifying all water sources, quantifying moisture levels, and documenting existing conditions. Thermal imaging cameras costing $5,000-$15,000 detect hidden moisture in walls and insulation invisible to visual inspection—these cameras show temperature differentials revealing moisture presence as wet materials maintain different temperatures than surrounding dry materials. Professional moisture meters measuring 0-99% moisture content quantify water in materials establishing baseline conditions and identifying active damage requiring remediation before encapsulation.
Hygrometers document ambient humidity levels throughout crawl spaces at multiple locations characterizing humidity distribution rather than relying on single-point measurements. Professional assessment identifies vapor intrusion from exposed soil, groundwater seepage through foundations, surface water accumulation from poor drainage, plumbing leaks from deteriorated pipes or joints, and condensation on cold surfaces from elevated humidity.
Removal of existing debris, damaged insulation, mold-contaminated materials, and items stored in crawl spaces clears work areas for installation. Contaminated materials require proper disposal following EPA guidelines—moldy insulation and materials cannot simply be discarded in regular refuse. Many jurisdictions require sealed bags and specific disposal methods for mold-contaminated waste.
Mold remediation when contamination exceeds 10 square feet or involves toxic species like Stachybotrys chartarum requires professional protocols including containment preventing spore distribution, HEPA filtration of work areas, removal of contaminated materials, antimicrobial treatment of structural members, and post-remediation verification testing. The Institute of Inspection, Cleaning and Restoration Certification establishes that 10 square feet represents the threshold requiring professional remediation rather than homeowner cleaning.
Structural repairs address moisture damage including sister joisting of weakened floor members, replacement of deteriorated sill plates, and foundation crack repair. Wood moisture content exceeding 28% supports decay fungi—materials at this level require evaluation for structural adequacy. Repairs must be completed before encapsulation installation ensuring systems protect sound structures rather than concealing ongoing deterioration.
Drainage Installation if Required (Days 2-3)
Properties with groundwater intrusion begin with drainage system installation before vapor barrier placement. Excavation of perimeter trenches along foundation interior walls provides space for drainage pipe—trenches typically measure 12 inches wide by 12-18 inches deep extending to below footing level for effective water collection. Excavation in crawl spaces requires specialized equipment or hand digging when access limitations prevent machinery use.
Installation of perforated drainage pipe with appropriate gravel bedding promotes water flow while filtering soil particles. Three-quarter inch drainage rock surrounding pipes provides void space for water flow while preventing soil infiltration that would clog perforations. Landscape fabric wrapping drainage rock prevents soil migration into rock over time—installations without fabric experience reduced effectiveness as fine soil particles fill voids between rocks.
Sump basin placement at lowest points or locations convenient for discharge line routing requires level, stable setting on compacted gravel or concrete bases. Basins must have drainage pipes entering properly to prevent sediment accumulation—pipes should enter several inches above basin bottoms allowing sediment settling without blocking pipe openings.
Sump pump installation includes primary pumps with proper electrical connections using GFCI-protected circuits per National Electrical Code requirements, battery backup systems with charging infrastructure, and discharge piping to exterior with check valves and proper slope. Systems require testing verifying proper operation—technicians pour water into basins confirming activation at appropriate levels, adequate discharge capacity, and backup system function during simulated power failures.
Vapor Barrier Installation (Days 3-4)
Vapor barrier material laid across entire crawl space floor with proper overlaps at seams of minimum 12 inches per code requirements creates continuous moisture barriers. Installation proceeds systematically ensuring complete coverage without gaps—installers work from one end toward access points preventing need to walk on installed barriers which could cause displacement or damage.
Extension up foundation walls with mechanical attachment provides positive securing resisting displacement from foot traffic or material settlement. Termination bars—metal or plastic strips—screwed into foundations every 12-18 inches hold barriers securely at top edges. The barrier extends 12-18 inches up walls creating continuous moisture barriers from floor to walls preventing moisture wicking through interfaces.
All seams require sealing with specialized seam tape applied to clean, dry surfaces following manufacturer specifications. Surface preparation proves critical—tape applied to dirty or damp surfaces fails prematurely. Tape must be rolled firmly using hand rollers ensuring complete adhesion and air-free application preventing future separation. Proper seam sealing creates vapor-impermeable joints—inadequately sealed seams allow moisture transmission at overlaps potentially accounting for 30-50% of total vapor transmission in poorly installed systems.
Custom cutting and fitting around all obstacles—piers, posts, utility penetrations—ensures complete coverage at these detail areas. Installers take careful measurements and create templates for complex shapes rather than leaving gaps around obstacles. Sealing around penetrations uses compatible sealants adhering to both barrier material and penetrating elements creating complete seals.
Insulation Application (Days 4-5)
Foundation wall preparation includes cleaning surfaces to remove dirt, dust, and loose material preventing insulation adhesion. Spray foam requires clean, dry surfaces for proper bonding—contaminated surfaces result in poor adhesion and potential delamination. Pressure washing or wire brushing removes surface contamination followed by allowing adequate drying time before foam application.
Application of closed-cell spray foam achieving minimum R-10 value throughout all foundation walls creates continuous thermal envelopes. Professional spray foam contractors use specialized equipment maintaining proper material temperatures and mix ratios—improper mixing results in foam that doesn't cure properly or achieves inadequate R-value per inch. Two to three inch thickness provides R-12 to R-21 exceeding code minimums while providing robust condensation prevention.
Coverage extends from floor level to rim joist areas without gaps or thin spots that would create thermal bypasses. Installers monitor thickness during application using depth gauges ensuring consistent coverage. Rim joist areas receive particular attention as these represent major thermal and air leakage sites—complete filling of band joist cavities provides substantial energy efficiency improvement.
Alternatively, rigid foam board installation requires careful cutting to exact dimensions, adhesive or mechanical fastening to foundations, and separate air sealing of all joints using compatible sealant or tape. Board edges must fit tightly against adjacent boards—gaps create thermal bypasses reducing effectiveness. Mechanical fasteners provide positive attachment supplementing adhesive preventing delamination.
Final Sealing and Equipment Installation (Days 5-6)
Vent sealing uses insulated covers mechanically fastened to foundations providing permanent closures. Covers made from rigid foam board or molded plastic fit vent openings precisely creating tight seals. Mechanical fastening with masonry screws or expansion anchors ensures covers resist displacement from wind pressure or animal activity.
Crawl space door replacement with insulated, gasketed units creates airtight entries. Quality doors include compression gaskets around entire perimeter, insulated panels providing thermal breaks, and secure latching mechanisms maintaining closure. Doors should include proper weather-stripping preventing air infiltration around edges while allowing easy opening for access.
Sill plate and rim joist sealing uses spray foam or compatible sealants addressing major air infiltration sites. These areas connect crawl spaces to wall cavities and sometimes to living spaces—proper sealing prevents air movement through these pathways improving both moisture control and energy efficiency. Blower door testing before and after sealing quantifies air leakage reduction confirming sealing effectiveness.
Dehumidifier installation includes proper placement in central locations allowing air circulation throughout spaces, connection of drain lines to sump basins or exterior discharge, and setting target humidity levels. Units should be positioned away from walls allowing adequate airflow around all sides. Electrical connections require GFCI protection per National Electrical Code—many installations include dedicated circuits for dehumidifier operation.
Final system testing verifies all components function properly. Dehumidifiers should achieve target humidity within 24-48 hours of operation—failure to reach targets indicates inadequate unit sizing, incomplete air sealing, or ongoing moisture sources requiring investigation. Sump pumps undergo testing with water addition confirming proper activation and discharge. Vapor barriers receive inspection for any damage during installation requiring repair.
Project Timeline and Expectations
Total project timelines for typical residential crawl spaces of 1,000-1,500 square feet range from 3-7 days depending on complexity, drainage requirements, mold remediation needs, and structural repairs. Simple encapsulation without drainage or remediation may complete in 3-4 days while comprehensive projects requiring all components extend to 7-10 days.
Weather impacts installation schedules—heavy rain may delay drainage excavation or foundation repairs requiring dry conditions. Homeowners should plan for potential weather-related delays during Pacific Northwest wet season. Access limitations in crawl spaces under 24 inches in height dramatically increase labor time as workers must crawl rather than crouch—projects in low-clearance spaces may require 30-50% longer timelines than standard-height installations.
Costs for Pacific Northwest Encapsulation
Understanding cost factors helps homeowners budget appropriately and compare proposals from multiple contractors. Prices vary based on crawl space size, site conditions, required components, and regional market rates.
Base Encapsulation Costs
| Crawl Space Size | Basic Encapsulation | With Drainage System | With Mold Remediation |
|---|---|---|---|
| 500 sq ft | $1,500-$3,500 | $3,000-$5,000 | $4,000-$7,000 |
| 1,000 sq ft | $3,000-$7,000 | $5,500-$9,000 | $7,000-$12,000 |
| 1,500 sq ft | $4,500-$10,500 | $8,000-$13,000 | $10,000-$17,000 |
| 2,000 sq ft | $6,000-$14,000 | $10,000-$17,000 | $13,000-$22,000 |
Average cost for 1,000 square foot basic encapsulation in Seattle and Portland runs $5,500 including vapor barrier, wall insulation, sealing, and dehumidifier. Price range of $3-7 per square foot applies to basic encapsulation while projects requiring drainage systems, mold remediation, or structural repairs range $8-12+ per square foot depending on extent of work.
Cost Component Breakdown
Vapor barrier materials including 10-20 mil reinforced polyethylene represent 15-20% of total project costs. Commercial-grade materials cost $0.50-1.00 per square foot compared to $0.20-0.40 for basic construction plastic—the price differential reflects superior durability and performance.
Insulation materials including closed-cell spray foam or rigid foam board account for 10-15% of costs. Spray foam installation costs $1.50-3.00 per square foot applied depending on thickness while rigid foam board costs $0.75-1.50 per square foot plus installation labor.
Dehumidifiers and equipment represent 15-20% of project costs with commercial crawl space units ranging $800-1,500 retail. Professional installation includes proper sizing calculations, electrical connections, drain line routing, and system testing.
Drainage systems when required account for 20-30% of total costs including pipe materials ($3-5 per linear foot), gravel bedding ($40-60 per cubic yard), sump basin ($80-150), pumps ($150-400 each for primary and backup), and discharge piping ($2-4 per linear foot).
Labor including installation, preparation, and cleanup represents 40-50% of total project costs. Skilled installation requires training and experience—improper installation compromises system effectiveness regardless of material quality. Professional crews complete typical installations more quickly and effectively than inexperienced contractors.
Disposal and preparation including debris removal and mold remediation accounts for 5-10% when required. Mold remediation alone ranges $2,000-5,000 for typical projects depending on contamination extent.
Factors Increasing Costs
Difficult access requiring material hand-carrying rather than mechanical transport adds 15-25% to labor costs. Crawl spaces with only small access doors or requiring material movement through homes increase installation time substantially.
Low clearance below 24 inches severely restricts work efficiency requiring workers to crawl rather than crouch. Spaces under 18 inches may be inaccessible for encapsulation without excavation—a significant expense adding $3,000-8,000 depending on required depth increase.
Obstacles including numerous piers, complex plumbing arrays, or HVAC equipment increase installation time for proper fitting and sealing around these elements. Crawl spaces with 20+ piers require substantially more cutting, fitting, and sealing than open spaces.
Existing contamination requiring extensive mold remediation, rodent waste cleanup, or structural repairs substantially increases project scope beyond basic encapsulation. Remediation costs depend on contamination extent—minor remediation adds $1,000-2,000 while extensive remediation requiring removal of large quantities of contaminated material adds $5,000-10,000+.
Remote locations requiring longer travel times for crews and materials may include trip charges or higher labor rates. Properties outside primary service areas commonly pay 10-20% premiums covering additional travel time and logistics.
Return on Investment
Energy savings alone provide payback in 7-12 years for typical installations based solely on reduced heating costs without considering prevented structural repairs or health benefits. Heating cost reductions of $200-500 annually accumulate to $2,000-5,000 over 10 years partially offsetting installation costs.
When prevented repairs are considered—floor joist replacement ($10,000-30,000), foundation waterproofing ($8,000-25,000), mold remediation ($5,000-15,000 over years)—payback commonly occurs within 5-7 years. Comprehensive encapsulation addresses root causes permanently eliminating these recurring expenses.
Homes requiring structural repairs without encapsulation commonly spend $10,000-30,000 over 10-15 years addressing recurring moisture problems through repeated remediation, repairs, and partial solutions. Professional encapsulation provides permanent solutions avoiding these recurring costs.
Property value enhancement at resale provides additional return. Moisture-damaged crawl spaces reduce home sale prices 10-20% according to real estate data as buyers negotiate reductions for required repairs or decline purchases entirely. Professionally encapsulated crawl spaces with transferable warranties enhance marketability and may increase values 5-10% by addressing common buyer concerns.
If your Seattle or Portland home shows crawl space moisture problems, call (877) 360-5502 for professional assessment and detailed proposals. We provide inspections with thermal imaging, transparent pricing, and financing options for projects exceeding $5,000.
Comparing Crawl Space Solutions
Different approaches address moisture with varying effectiveness depending on sources, severity, and climate. Understanding each option's strengths and limitations helps homeowners select appropriate solutions.
| Solution | Effectiveness | Cost Range | Lifespan | Pacific Northwest Rating |
|---|---|---|---|---|
| Full Encapsulation | 95-100% | $3,000-$12,000 | 20-25 years | ⭐⭐⭐⭐⭐ Essential for permanent control |
| Vapor Barrier Only | 70-80% | $1,500-$4,000 | 10-15 years | ⭐⭐⭐ Temporary, plan upgrade within 5 years |
| Dehumidifier Alone | 40-60% | $1,200-$2,500 | 5-10 years | ⭐⭐ Insufficient without vapor barrier |
| Exterior Drainage | 60-80% | $3,000-$8,000 | 15-20 years | ⭐⭐⭐⭐ Essential supplement, not standalone |
| Sump Pump System | 70-85% | $800-$2,500 | 10-15 years | ⭐⭐⭐⭐ Required for groundwater, combine with encapsulation |
| Crawl Space Vents | 0-30% | $200-$1,000 | N/A | ⭐ WORSENS moisture in humid climates |
Why Full Encapsulation Outperforms Alternatives
Pacific Northwest crawl spaces face multiple simultaneous moisture sources creating cumulative loads exceeding any single solution's capacity. Soil vapor intrusion releases 10-15 gallons daily, groundwater under hydrostatic pressure from saturated clay soil intrudes continuously, surface water from 150+ rainy days accumulates without proper drainage, ambient marine air humidity at 65-75% year-round enters through gaps, and condensation forms when humid air contacts cold surfaces.
Patchwork approaches address single sources leaving others uncontrolled. Vapor barriers without dehumidifiers stop soil moisture but marine air humidity maintains 65-75% crawl space humidity above the 60% mold threshold. Dehumidifiers without vapor barriers fight continuous moisture release from exposed soil—effectively trying to dehumidify the earth while energy costs skyrocket. Drainage without encapsulation controls groundwater but vapor intrusion and ambient humidity continue unabated.
Only comprehensive encapsulation addresses all sources simultaneously through integrated systems where components work synergistically. Vapor barriers stop soil moisture (40-50% of total load), sealed systems prevent humid air entry (20-30% of load), dehumidifiers maintain optimal humidity processing remaining moisture (20-30%), insulation prevents condensation eliminating this source entirely, and drainage removes groundwater before entry (variable 10-50% depending on site).
Lifecycle Cost Analysis
Initial investment for comprehensive encapsulation ($5,000-10,000 typical) exceeds patchwork approaches ($1,500-3,000) creating temptation to choose inadequate solutions. However, lifecycle costs over 15 years favor comprehensive solutions dramatically.
Patchwork approaches require repeated interventions: vapor barrier replacement every 5-7 years ($1,500-3,000), repeated mold remediation every 2-4 years ($2,000-5,000), structural repairs from progressive moisture damage ($5,000-15,000), and eventual comprehensive encapsulation after partial solutions fail ($5,000-10,000). Total costs over 15 years range $15,000-30,000 in repeated interventions plus ongoing energy waste.
Comprehensive encapsulation total costs over 15 years include initial investment ($5,000-10,000) plus dehumidifier replacement at 7-10 years ($800-1,500) and minor maintenance ($500-1,000). Total: $6,000-12,000 while providing superior moisture control, better indoor air quality, improved energy efficiency, and maintained property value.
Savings of $10,000-20,000 over typical homeownership periods combined with superior performance and health protection justify comprehensive approaches for Pacific Northwest conditions.
Get Crawl Space Encapsulation in Your Area
Professional encapsulation services throughout Washington and Oregon provide permanent moisture solutions designed for Pacific Northwest conditions.
Washington: Seattle | Bellevue | Tacoma | Kirkland | Redmond | Renton | Issaquah | Sammamish | Kent | Auburn | Federal Way | Olympia | Everett | Spokane | Vancouver
Oregon: Portland | Beaverton | Hillsboro | Tigard | Gresham | Lake Oswego | Salem | Eugene | Springfield | Corvallis
FAQs: Crawl Space Encapsulation
How much does crawl space encapsulation cost in Seattle?
Average cost for 1,000 square foot crawl space basic encapsulation runs $5,500 in Seattle and Portland with typical range of $3,000-$7,000 including vapor barrier, wall insulation, sealing, and dehumidifier. Projects requiring drainage systems add $2,500-$4,000 for perimeter drains, sump pumps, and backup systems. Mold remediation adds $2,000-$5,000 depending on contamination extent. Structural repairs for severe moisture damage add $3,000-$10,000+ depending on scope. Total project costs range $3-7 per square foot for basic work without complications, $8-12 per square foot for projects requiring drainage and remediation.
How long does crawl space encapsulation last?
Quality commercial-grade vapor barriers carry manufacturer warranties of 15-25 years and typically last 30+ years with proper installation. The material doesn't degrade significantly when protected from UV light and physical damage—properly installed barriers remain effective indefinitely. Dehumidifiers require replacement every 5-10 years depending on usage and maintenance ($800-1,500 replacement cost). Foundation wall insulation is essentially permanent lasting the lifetime of homes. Drainage systems and sump pumps require periodic maintenance with pump replacement every 7-10 years. Overall systems provide 20-30 years of effective moisture control with minimal maintenance—dehumidifier filter cleaning quarterly and annual system inspection.
Can I encapsulate my crawl space myself?
While DIY vapor barrier installation is technically possible for homeowners with construction experience, professional encapsulation provides critical advantages making DIY inadvisable except for simplest installations. Professionals use specialized assessment equipment identifying all moisture sources—thermal imaging cameras ($5,000-15,000), professional moisture meters, and hygrometers. Proper vapor barrier installation with sealed seams using specialized tapes maintaining adhesion for decades requires training—homeowners commonly use inappropriate tape failing within 2-3 years. Correctly sized dehumidification for Pacific Northwest humidity loads requires professional calculations—undersizing results in systems unable to achieve target humidity. Appropriate drainage system design for groundwater requires understanding flow patterns, discharge locations, and pump capacity sizing. Given Pacific Northwest's severe conditions, professional installation strongly recommended.
Will encapsulation make my floors warmer?
Yes, substantially. Encapsulation with foundation wall insulation creates thermal barriers preventing heat loss while bringing crawl spaces within homes' thermal envelopes. Homeowners typically report 5-8°F warmer floor temperatures in winter following installation—immediately noticeable improvement. Families report no longer needing slippers and children playing comfortably on floors previously too cold. Wall insulation (R-10 to R-15) prevents heat conducted through foundations from dissipating to exterior while maintaining crawl space temperatures 10-15°F warmer than uninsulated spaces. Energy savings of $200-500 annually for typical homes result from reduced heat loss and improved HVAC efficiency. Better temperature uniformity throughout homes eliminates cold first floors and overheated second floors.
Do I need a sump pump with encapsulation?
Sump pumps become necessary when groundwater intrusion occurs or seasonal water tables rise to crawl space floor levels—common throughout Pacific Northwest. Properties experiencing standing water during wet season, low-lying areas near water bodies, Portland metro clay soil areas, valley floor properties in Eugene and Salem, and Seattle lowland neighborhoods all commonly require drainage. Professional moisture assessment during wet season (January-March peak) determines necessity. Sump pump systems add $2,500-4,000 to encapsulation projects but prove essential for groundwater control. Attempting encapsulation without drainage in properties with active groundwater leads to system failure and recurring problems. Properties without groundwater don't require drainage—comprehensive assessment determines necessity avoiding unnecessary expense while ensuring adequate protection.
Is encapsulation worth the investment?
Encapsulation provides substantial return through multiple benefits. Energy savings alone provide 7-12 year payback based on heating cost reductions of $200-500 annually. Prevented structural repairs provide faster payback—floor joist replacement ($10,000-30,000), foundation repairs ($8,000-25,000), and recurring mold remediation ($5,000-15,000 over years) commonly exceed encapsulation costs. Property value enhancement at resale includes 10-20% price reduction for moisture-damaged crawl spaces versus potential 5-10% value increase for professionally encapsulated spaces with transferable warranties. Health benefits from improved indoor air quality and mold elimination protect family wellbeing. Systems provide 20-30 years of protection with minimal maintenance making them one-time investments avoiding recurring repairs. For Pacific Northwest conditions with 150+ rainy days, encapsulation represents necessary protection rather than optional upgrade.
Protect Your Pacific Northwest Home with Professional Encapsulation
Comprehensive crawl space encapsulation provides permanent protection against Pacific Northwest's relentless moisture creating dry, healthy environments beneath homes for decades. The integrated approach addressing all moisture sources simultaneously—vapor intrusion, groundwater, surface water, ambient humidity, and condensation—proves essential for Washington and Oregon conditions where partial solutions fail.
Professional installation ensures proper component selection, correct sizing, quality workmanship, and system integration creating moisture control exceeding DIY capabilities. Licensed contractors provide warranties on materials (15-25 years typical on vapor barriers) and workmanship (1-5 years), comprehensive assessments identifying all moisture sources, transparent pricing with detailed proposals, and financing options for projects exceeding $5,000.
The investment protects homes from wood rot requiring tens of thousands in structural repairs, foundation damage costing $8,000-25,000+, recurring mold problems affecting health and property value, and energy waste from uncontrolled moisture and poor insulation. Systems pay for themselves through prevented repairs and energy savings while providing improved comfort, better indoor air quality, and enhanced property value.
Call (877) 360-5502 now for professional crawl space assessment and permanent encapsulation solutions throughout Washington and Oregon. We provide 24/7 emergency service, inspections with thermal imaging and moisture mapping, and direct insurance coordination. Don't let Pacific Northwest moisture destroy your home's foundation—protect your investment with comprehensive professional encapsulation designed for regional conditions.