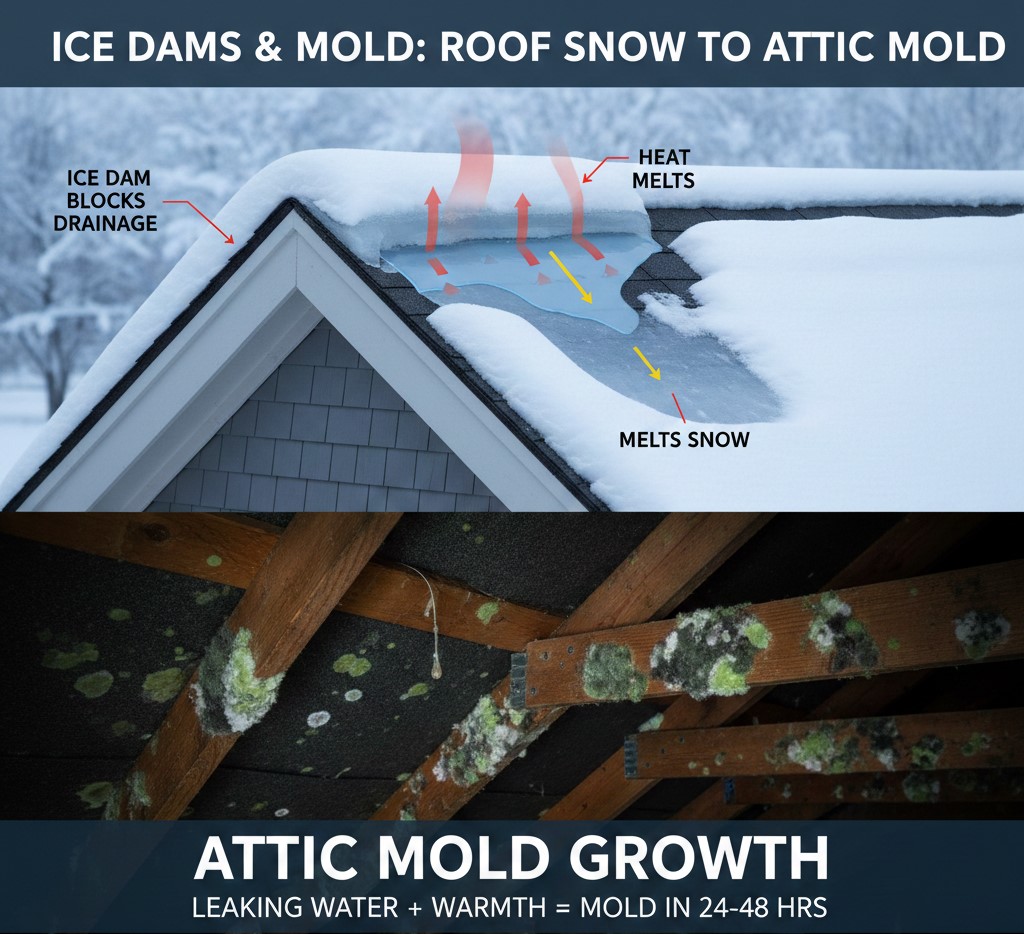
Winter in the Northeast and Midwest brings more than just snow—it creates the perfect conditions for ice dams that can lead to serious attic mold problems. Ice dams form when heat escapes into your attic, melting roof snow that refreezes at the eaves and blocks proper drainage. This trapped water seeps under shingles and into your attic, where mold can develop within 24-48 hours according to EPA guidelines. For homeowners across New York, Pennsylvania, Illinois, Ohio, and Michigan, understanding this connection between winter roof conditions and indoor mold growth is essential for protecting both your home's structure and your family's health.
If you notice water stains on your ceiling, musty odors, or visible mold growth in your attic, call our certified mold remediation specialists at (877) 360-5502 for immediate inspection and treatment.
What Are Ice Dams?
Ice dams are thick ridges of ice that form along the edges of your roof, typically at the eaves and in valleys. Unlike simple icicles, ice dams create a physical barrier that prevents melted snow from draining off your roof. These formations can weigh hundreds of pounds and extend several feet up your roofline, trapping pools of water behind them.
The problem occurs most frequently in cold-climate regions where homes experience heavy snowfall combined with temperature fluctuations. When these ice barriers develop, they fundamentally change how water moves across your roof. Instead of flowing down and away from your home through gutters, meltwater accumulates behind the dam with nowhere to go. This standing water eventually finds its way under roofing materials—a pathway that leads directly to attic spaces where mold thrives in damp conditions.
Northeast and Midwest states experience ideal conditions for ice dam formation. Regular snowfall provides the raw material, while home heating systems create the temperature differential that drives the melting-refreezing cycle. Older homes in these regions, particularly those built before modern insulation standards, face the highest risk due to inadequate attic insulation and ventilation systems.
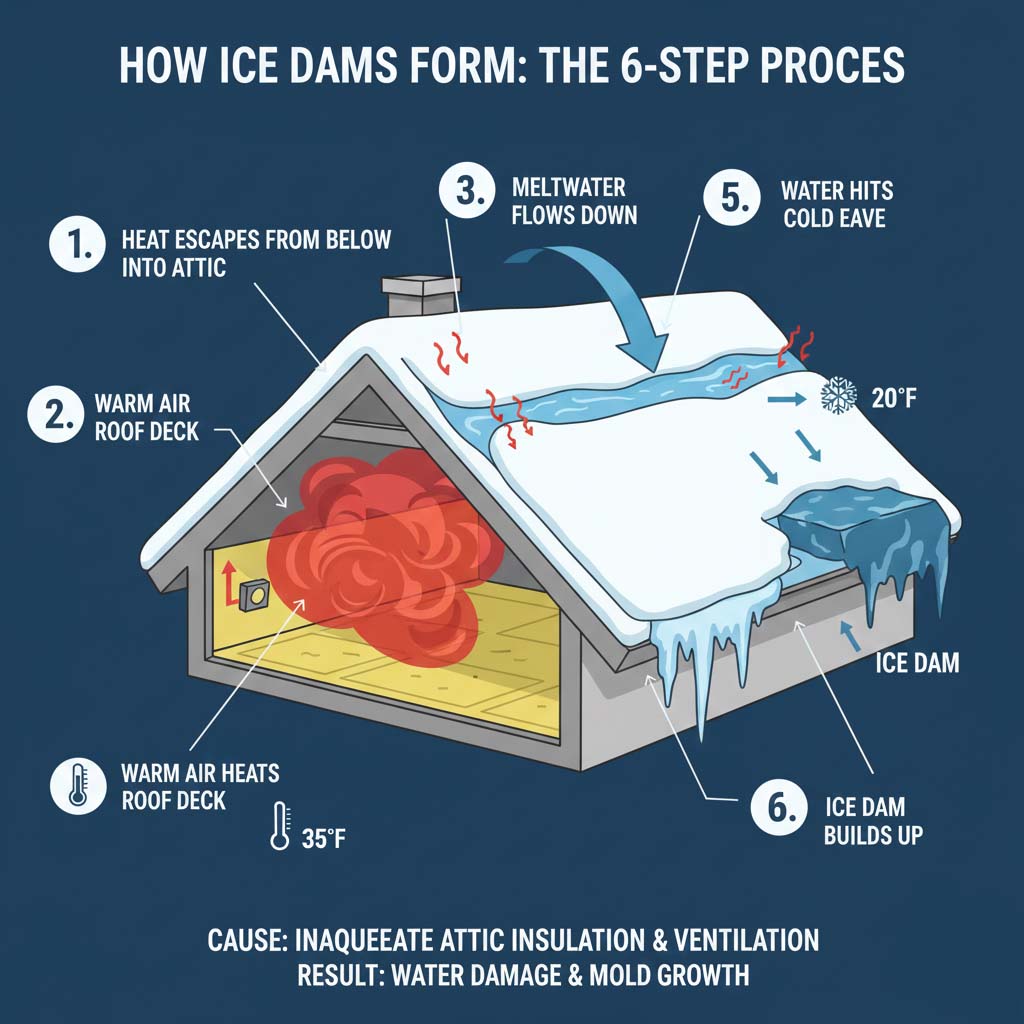
How Ice Dams Form: The 6-Step Process
Ice dam formation follows a predictable cycle driven by heat loss from your home's interior. Heat escapes from living spaces into the attic through gaps in insulation, unsealed penetrations, and poorly insulated areas. This warm air accumulates in the attic space, raising the temperature of the underside of your roof deck above freezing even when outdoor temperatures remain well below 32°F.
The warmed roof deck melts the bottom layer of snow resting on your roof. This creates a thin film of water between the snow and the shingles, which flows downward following gravity. As this meltwater travels down the roof slope, it eventually reaches the eaves—the section of roof that overhangs beyond your home's heated interior. Without warm air beneath it, this overhang remains at ambient temperature, typically well below freezing during winter.
When flowing water contacts this cold surface, it refreezes instantly. The first freeze creates a small ridge of ice at the roof's edge. With each subsequent melting cycle, more water flows down, encounters the existing ice, and freezes in place. This continuous process builds progressively larger ice formations. Within days of sustained melting conditions, a substantial ice dam develops—often 6 to 12 inches thick and extending several feet up the roof.
The primary cause lies in attic heat loss. Research indicates that 80% of ice dam cases stem from inadequate attic insulation combined with insufficient ventilation. Even small gaps around recessed lighting, plumbing penetrations, or attic access hatches can allow enough warm air into the attic to trigger the melting process. In homes with proper insulation and air sealing, the attic temperature remains close to outdoor temperature, preventing the snow melt that initiates ice dam formation.
How Ice Dams Cause Water Damage
Once an ice dam reaches sufficient size, it creates a pool of standing water on your roof. Asphalt shingles are designed to shed water flowing downward through gravity and overlapping layers, not to resist standing water or water flowing upward. The backed-up water searches for any entry point, exploiting even minor defects in roofing materials.
Water penetration typically begins at shingle edges and nail holes. The standing water pools behind the ice barrier, sometimes several inches deep, creating hydrostatic pressure that forces water under the shingle tabs. From there, it contacts the underlayment—a water-resistant but not waterproof membrane beneath the shingles. While underlayment can withstand brief moisture exposure, prolonged contact with standing water allows seepage through seams and around fasteners.
Once water breaches the underlayment, it reaches the roof deck—typically plywood or OSB sheathing. These wood-based materials absorb water readily. The moisture spreads laterally through the deck and drips down onto attic insulation below. Fiberglass insulation acts like a sponge, wicking water throughout its mass and losing its insulating properties. The water continues downward, eventually reaching ceiling drywall where it appears as stains visible from inside your home.
The damage extends beyond visible water stains. Prolonged moisture exposure causes roof decking to swell, warp, and deteriorate. Fascia boards and soffit materials rot from sustained contact with ice and trapped moisture. In severe cases, the structural integrity of roof framing becomes compromised, requiring extensive repairs that far exceed simple shingle replacement costs.
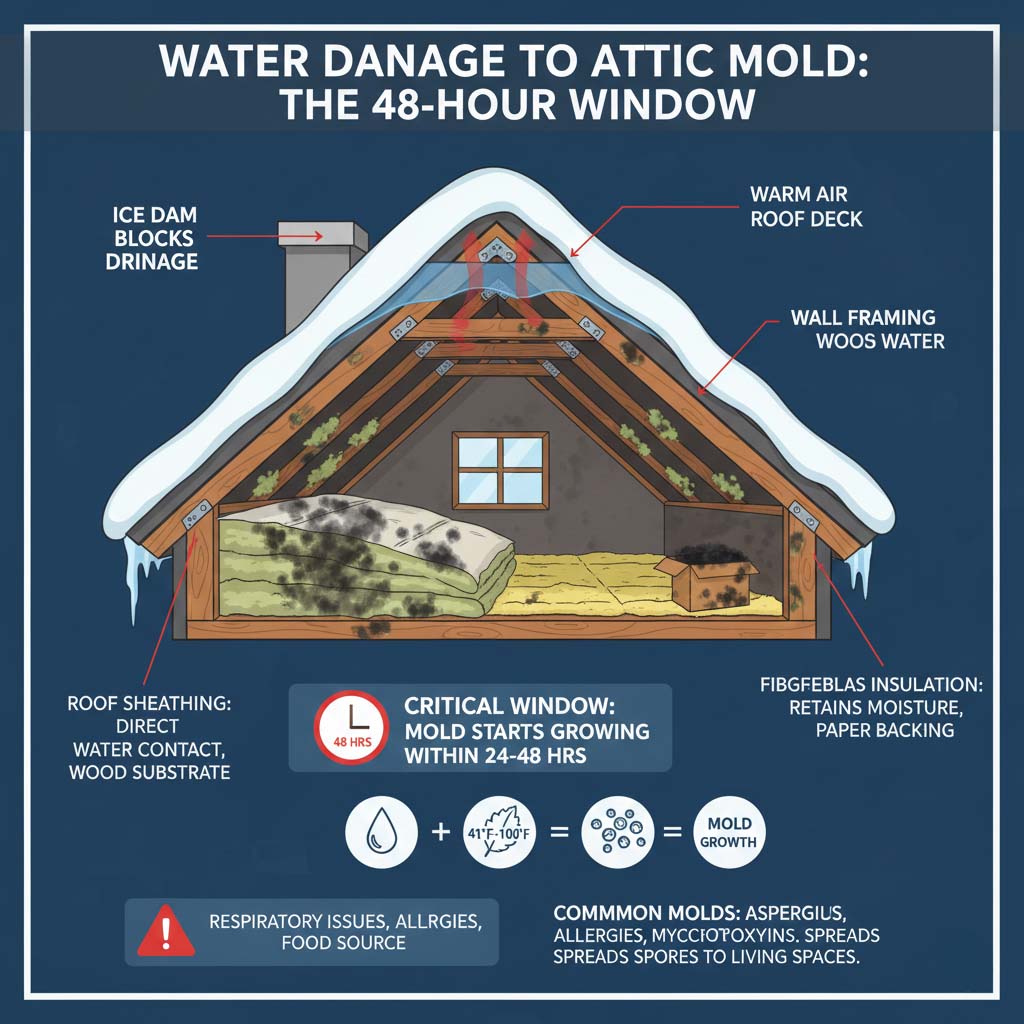
From Water Damage to Attic Mold: The 48-Hour Window
Attic spaces provide optimal conditions for mold colonization when moisture is introduced. Mold growth requires three components: moisture, organic material, and temperatures between 41°F and 100°F. Attics contain abundant organic materials including wood framing, roof decking, paper-backed insulation, and cardboard storage boxes. Winter attic temperatures typically fall within mold's preferred range, particularly in inadequately ventilated spaces where some heat from the home penetrates.
The EPA identifies 24 to 48 hours as the critical window for mold initiation following water damage. During this period, dormant mold spores—which exist naturally in virtually all environments—absorb moisture and begin germinating. By 72 hours, visible mold colonies start appearing on damp surfaces. Within one to two weeks, extensive mold growth can colonize large areas of an attic, spreading from the initial water intrusion point to adjacent materials through airborne spore distribution.
Wet insulation creates particularly favorable conditions. Once fiberglass or cellulose insulation becomes saturated, it remains damp for extended periods due to limited air circulation in attic spaces. The insulation material itself doesn't typically support mold growth, but the paper backing, dust, and organic debris trapped within it provide ample food sources. Mold growing on insulation releases spores throughout the attic, which settle on all surfaces and begin new colonies wherever moisture exists.
The health implications are significant. Many mold species produce allergens and irritants that affect respiratory systems, particularly in children, elderly individuals, and those with asthma or immune system conditions. Some molds, including Stachybotrys chartarum (commonly called black mold), produce mycotoxins that pose more serious health risks. The confined nature of attic spaces concentrates these biological contaminants, and air exchange with living spaces through ceiling penetrations can spread mold spores throughout your home.
Most Vulnerable Areas
| Attic Location | Why It's Vulnerable | Typical Mold Species |
|---|---|---|
| Fiberglass insulation | Retains moisture, paper backing provides food source, limited airflow prevents drying | Aspergillus, Penicillium |
| Ceiling cavities | Hidden moisture accumulation, poor ventilation, warm temperatures from living space below | Stachybotrys, Chaetomium |
| Roof sheathing | Direct water contact, wood substrate ideal for colonization | Aureobasidium, Cladosporium |
| Wall framing | Wood absorbs water readily, often remains damp long-term | Serpula lacrymans (dry rot fungus) |
Warning Signs: Ice Dams and Mold in Your Home
Exterior ice dam indicators appear before interior damage becomes visible. Large icicles hanging from roof edges, while sometimes present without ice dams, often signal the temperature differential that creates dams. More definitive is the presence of an ice ridge running along the eave—visible as a thick, irregular formation extending up the roof slope. Uneven snow melting patterns provide another clue; roofs with clear sections near the ridge but snow remaining along edges indicate heat loss that drives ice dam formation.
Water stains on exterior walls below the roofline suggest active water intrusion. These appear as dark streaks, discoloration, or ice buildup on siding materials. Check particularly around window frames and door openings on upper floors, where water tracking down from the roof often becomes visible.
Interior warning signs indicate water has already penetrated your home's envelope. Ceiling stains—appearing brown, yellow, or dark gray—mark where water has saturated drywall or plaster. These stains often appear in rings or irregular patterns and may feel damp to the touch. Peeling paint or bubbling drywall texture signals moisture trapped behind the surface material. In severe cases, ceiling materials sag or deform from water weight and structural weakening.
Attic mold growth produces distinctive indicators even before visible colonization appears. A musty, earthy odor is often the first warning sign, detectable when entering the attic or sometimes noticeable in upper-floor rooms. This smell indicates active mold growth and increases in intensity as colonization expands. Wet or compressed insulation loses its fluffy texture and appears matted or discolored. Dark spots or discoloration on wood surfaces—rafters, sheathing, or trusses—indicate either active mold growth or water staining that creates conditions for imminent growth.
Condensation on attic surfaces during winter suggests ventilation problems that compound ice dam risks. Frost accumulation on roof nails penetrating into the attic space indicates temperature and humidity issues that both contribute to ice dam formation and support mold growth.
If you observe active water leaking, black mold covering more than 10 square feet, structural sagging, or musty odors throughout your home, call (877) 360-5502 immediately. These conditions require professional assessment and remediation to prevent health risks and structural damage.
Ice Dams and Mold in Northeast & Midwest States
🗽 New York
Most affected cities: Buffalo, Rochester, Syracuse, and Albany
Buffalo, Rochester, Syracuse, and Albany experience some of the nation's heaviest snowfall due to lake-effect weather patterns from the Great Lakes. Buffalo averages 95 inches of snow annually, with individual storms depositing 12 to 24 inches. These conditions, combined with the region's older housing stock, create persistent ice dam problems.
Lake-effect snow falls when cold air masses move across the relatively warm Great Lakes, picking up moisture that precipitates as snow on the downwind shores. This phenomenon creates frequent snow events rather than a few large storms, establishing the continuous freeze-thaw cycles that build substantial ice dams. Many homes in Buffalo's historic neighborhoods and Rochester's older suburbs were built before modern insulation standards, with minimal attic insulation and poor air sealing.
The proximity to Lake Erie and Lake Ontario also elevates humidity levels, which accelerates mold growth once water intrusion occurs. Attic moisture levels in these areas often exceed the 60% relative humidity threshold that supports rapid mold colonization.
🏭 Pennsylvania
Most affected cities: Pittsburgh, Erie, Scranton, and Allentown
Pittsburgh, Erie, Scranton, and Allentown face unique ice dam challenges from Pennsylvania's variable winter weather. Erie, positioned on Lake Erie's southern shore, receives over 100 inches of snow annually with intense lake-effect storms. In contrast, Philadelphia averages only 20 inches, but the state's mountainous regions experience heavy snowfall with steep roof pitches that accumulate substantial snow loads.
Bright winter sun in Pennsylvania creates particularly problematic conditions. Even when air temperatures remain below freezing, direct sunlight heats dark-colored roofing materials enough to initiate melting. This solar-driven melting continues throughout the day, with water refreezing each evening as temperatures drop, building ice dams rapidly.
Historic neighborhoods in Pittsburgh and coal-region communities feature homes built between 1880 and 1940, many with uninsulated attics or inadequate ventilation systems. These older structures often have been renovated multiple times, creating inconsistent insulation coverage and numerous air leakage points. Steep-pitched roofs common in mountain communities shed snow poorly, allowing heavy accumulation that increases ice dam severity.
🌆 Illinois
Most affected cities: Chicago, Rockford, Springfield, and Peoria
Chicago, Rockford, Springfield, and Peoria endure harsh Midwest winters with average snowfall ranging from 36 inches in Chicago to over 40 inches in northern regions. Wind chill accelerates freeze-thaw cycling, as subfreezing air temperatures combine with solar heating to create the temperature differentials that drive ice dam formation.
Chicago's urban heat island effect complicates ice dam patterns. Downtown areas and densely developed neighborhoods experience temperatures several degrees warmer than surrounding suburbs, creating more aggressive melting cycles. The region's characteristic Chicago bungalows—compact homes built between 1910 and 1940—typically have minimal attic space, making proper insulation and ventilation installation challenging.
Flat or low-slope roofs common in urban commercial and residential buildings face particular ice dam risks. Without gravity-driven drainage, even minor ice formations can trap significant water. Many buildings constructed before 1980 lack adequate insulation, with R-values far below current recommended levels.
🏈 Ohio
Most affected cities: Cleveland, Columbus, Cincinnati, and Toledo
Cleveland, Columbus, Cincinnati, and Toledo demonstrate varied ice dam risks across Ohio's diverse geography. Northern counties along Lake Erie experience lake-effect snow similar to Buffalo, with Cleveland averaging 60 inches annually. Toledo receives consistent winter precipitation and sustained cold temperatures that maintain snow cover for extended periods.
Ohio's high winter humidity, averaging 70-75%, accelerates mold growth following water intrusion. The state's numerous homes built during the manufacturing boom of the 1940s-1970s often feature minimal insulation and ventilation, as energy efficiency wasn't a primary construction consideration during this period.
Cleveland's historic neighborhoods and Toledo's older suburbs contain many homes with basement moisture issues that elevate overall home humidity levels. This baseline moisture creates faster mold colonization when ice dam leaks introduce additional water into attic spaces.
🚗 Michigan
Most affected cities: Detroit, Grand Rapids, Lansing, and Ann Arbor
Detroit, Grand Rapids, Lansing, and Ann Arbor face severe ice dam challenges throughout Michigan's long winter season, which extends from November through March. The state's proximity to the Great Lakes ensures heavy, consistent snowfall—Grand Rapids averages 75 inches annually, while Detroit receives approximately 45 inches.
Michigan's manufacturing-era housing stock, built primarily between 1920 and 1970, features construction standards that prioritized affordability over energy efficiency. These homes typically have minimal attic insulation (often R-19 or less, compared to current recommendations of R-49 to R-60), poor air sealing, and inadequate ventilation systems.
Snow accumulation on flat garage roofs attached to homes creates particularly severe ice dam problems. The unconditioned garage space below provides no heat, but the connection to the main house allows some warm air transfer that initiates melting. One in four homes in the Midwest experiences ice dams annually, with Michigan representing a significant portion of these cases due to prolonged cold weather and heavy snowfall.
The state's professional remediation industry reports that ice dam-related mold cases peak in March and April, when warming temperatures finally allow homeowners to access attics and discover damage that accumulated throughout winter.

How to Prevent Ice Dams and Attic Mold
Prevention centers on maintaining your attic as a cold, dry, well-ventilated space. When attic temperature remains close to outdoor temperature, snow on your roof doesn't melt, eliminating the water source that creates ice dams. This requires a three-part approach: adequate insulation, proper ventilation, and comprehensive air sealing.
Attic Insulation: Regional Standards
Climate zones 5 and 6, which encompass New York, Pennsylvania, Illinois, Ohio, and Michigan, require R-49 to R-60 insulation values in attic floors. This typically translates to 16 to 20 inches of fiberglass batt or blown cellulose insulation. The insulation must provide uniform coverage across the entire attic floor with no gaps, compressed areas, or thin spots.
Focus insulation efforts on critical areas including the attic floor between joists, access hatches and pull-down stair assemblies, spaces above garage ceilings attached to the home, and areas around recessed lighting fixtures. IC-rated (insulation contact) recessed lights allow direct insulation contact, while non-IC fixtures require 3-inch clearance—a gap that compromises thermal performance and creates a significant heat loss point.
Common insulation mistakes undermine ice dam prevention. Over-compressing insulation to fit in tight spaces reduces its R-value proportionally to the compression—insulation rated at R-30 compressed by 50% provides only R-15. Blocking soffit vents with insulation prevents the air intake necessary for proper ventilation. Leaving gaps around chimneys and plumbing penetrations creates pathways for warm air to enter the attic.
If your existing insulation is wet from ice dam damage, do not attempt to dry and reuse it. Wet insulation loses its effectiveness and becomes a mold growth substrate. Call (877) 360-5502 for professional mold inspection and safe insulation removal before installing new materials.
Proper Attic Ventilation
Building codes specify one square foot of ventilation per 300 square feet of attic space (the 1:300 rule). This ventilation must be balanced between intake and exhaust to create continuous airflow. Intake vents located in soffits allow cool exterior air to enter the attic at its lowest point. This air flows upward through the attic space and exits through exhaust vents at the ridge, gable ends, or via roof-mounted vents near the peak.
The combination of soffit and ridge vents provides the most effective system, creating natural convection as warm air rises and escapes at the ridge while drawing cool air in through soffits. This continuous airflow maintains attic temperature close to outdoor temperature, prevents moisture buildup, and inhibits the conditions that create ice dams.
Poor ventilation manifests through observable signs. Frost forming on the underside of roof sheathing or coating exposed nails indicates high humidity levels and inadequate air exchange. Musty odors even without water leaks suggest moisture accumulation from condensation. Summer attic temperatures exceeding 140°F indicate insufficient ventilation, which correlates with inadequate winter performance.
Powered attic fans require careful consideration. While they increase air exchange, they can depressurize the attic, potentially drawing conditioned air from living spaces through any gaps in the ceiling—the opposite of the goal. They work best in conjunction with proper passive ventilation and comprehensive air sealing.
Air Sealing: Stop Heat Loss
Air leakage from living spaces into attics accounts for 80% of ice dam cases. Even a small 1-inch gap around a chimney chase can allow several hundred cubic feet of warm air per hour into the attic—enough to melt snow and create ice dams.
Priority sealing locations include chimney penetrations where brick or metal flues pass through the ceiling into the attic. These large openings often have substantial gaps. Use fire-rated caulk or metal flashing to seal the space between chimney and framing. Recessed lighting fixtures, particularly non-IC rated models, create both a hole for air movement and a source of radiant heat. Install IC-rated fixtures or replace with surface-mounted alternatives.
Plumbing stacks and vent pipes penetrating the ceiling create circular openings that allow heat transfer through convection. Seal around these penetrations with expanding foam or rigid foam boards cut to fit, finished with caulk. Attic access hatches and pull-down stairways represent major air leakage points. Install weatherstripping around the hatch perimeter and add rigid foam insulation to the back of the hatch door to match surrounding insulation levels.
Electrical wiring holes, HVAC ducts located in attic spaces, and ceiling-mounted fans all provide pathways for heat loss. Identify all penetrations systematically and seal them completely. A blower door test performed by an energy auditor can quantify air leakage and identify hidden gaps.
DIY air sealing works for accessible areas using caulk for cracks smaller than 1 inch and expanding foam for larger gaps. However, spray foam insulation applied by professionals provides superior air sealing, particularly in complex areas around chimneys and recessed fixtures where fire safety codes must be followed precisely.
Maintenance: Year-Round Prevention
Fall preparation during October and November sets the stage for winter protection. Clean gutters and downspouts completely to ensure any water that does melt can drain effectively. Inspect the roof for damaged, missing, or loose shingles that could allow water entry even without ice dams. Check attic insulation depth and condition, replacing any compressed or damaged materials. Test attic ventilation by observing whether soffit vents are clear and whether air flows freely through the attic space.
During winter, remove snow from roofs after storms depositing more than 6 inches. Use a roof rake operated from the ground—never climb on an icy roof. Focus on clearing the lower 3 to 4 feet of the roof edge where ice dams form. Monitor for icicle formation, which may indicate early ice dam development. Check attic spaces monthly for frost accumulation, condensation, or water stains that signal problems requiring immediate attention.
Spring inspection during March and April allows assessment of winter damage before it worsens. Examine attic spaces thoroughly for water stains on sheathing, framing, and insulation. Check insulation for dampness or compression. Look for any mold growth on wood surfaces or insulation materials. Repair any damage discovered and address the underlying insulation, ventilation, or air sealing deficiencies before the next winter season.
What to Do If You Have Ice Dams Right Now
Addressing active ice dams requires immediate action while avoiding methods that damage roofing materials or create safety hazards. Several common approaches cause more harm than good. Rock salt or calcium chloride scattered directly on shingles damages the granular coating that protects against UV degradation and weather. Chipping ice away with hammers, pry bars, or other tools breaks shingles, tears underlayment, and dents metal roofing or gutters. Climbing on ice-covered roofs creates serious fall risks—roofing contractors experience numerous injuries each winter from this activity.
Heat cables installed improperly or after ice dams have already formed provide limited benefit and create fire hazards when not installed according to manufacturer specifications. Most importantly, ignoring ice dams allows water intrusion to continue, with mold growth beginning within 24 to 48 hours of materials becoming wet.
Safe immediate actions begin with snow removal from the roof. Use a roof rake with an extended handle operated while standing on the ground. Clear the lower 3 to 4 feet of the roof slope, removing the snow source that feeds ice dam formation. Professional snow removal services charge $250 to $500 per visit depending on roof size and snow depth, providing safe removal without the homeowner assuming risk.
Creating drainage channels through existing ice dams allows trapped water to escape. Fill fabric tubes (old pantyhose work effectively) with calcium chloride ice melt. Lay these tubes perpendicular to the ice dam, extending from the roof ridge down across the dam to the gutter. The calcium chloride melts through the ice, creating a channel for water flow. This method works slowly but safely, requiring several hours to establish drainage.
Protect interior spaces by placing buckets or containers under active leaks. Move furniture, electronics, and valuables away from affected areas. Document all damage with photographs for insurance claims, noting dates, locations, and extent of water intrusion. Contact your insurance company promptly, as many policies cover sudden water damage from ice dams if not resulting from long-term maintenance neglect.
Professional ice dam removal using steam is the safest and most effective method. Low-pressure steam melts ice without damaging roofing materials, unlike high-pressure washing which can drive water under shingles and tear off granules. Steam removal costs $800 to $2,400 depending on ice dam size and roof complexity, with most homeowners paying approximately $1,200. The process removes ice completely rather than creating temporary channels, preventing further water intrusion.

Professional Mold Remediation: When to Call (877) 360-5502
Professional mold remediation becomes necessary when contamination exceeds safe DIY limits or involves areas where improper handling creates health risks. The EPA and IICRC (Institute of Inspection, Cleaning and Restoration Certification) establish 10 square feet as the threshold requiring professional intervention. Mold covering areas larger than a 3-foot by 3-foot section requires specialized equipment, containment procedures, and safety protocols beyond typical homeowner capabilities.
Mold growth within HVAC systems demands professional remediation. Ductwork, air handlers, and ventilation systems distribute mold spores throughout your entire home when contaminated. Cleaning requires specialized biocides, HEPA filtration during the process, and verification testing to ensure complete removal. Attempting DIY remediation of HVAC mold almost always results in wider spore distribution and recurring contamination.
Structural damage accompanying mold growth indicates the need for professional assessment. Sagging ceilings or walls, soft or rotting wood framing, and compromised roof decking require evaluation by licensed contractors who can determine whether structural repairs are necessary. Mold remediation professionals coordinate with structural repair contractors to ensure damaged materials are properly removed and replaced.
Health symptoms in household members warrant professional remediation even for smaller contaminated areas. Respiratory issues, persistent coughing, allergic reactions, or aggravated asthma symptoms indicate mold exposure affecting your family. Children, elderly individuals, and those with compromised immune systems face heightened risks. Professional remediation eliminates the exposure source rather than risking continued symptoms during prolonged DIY efforts.
Mold that returns after DIY cleaning reveals hidden moisture sources or incomplete remediation. Surface cleaning addresses visible mold but doesn't resolve underlying moisture problems or reach mold growing inside walls, under flooring, or within insulation. Professional mold remediation includes moisture mapping using thermal imaging and moisture meters to identify all affected areas, including those not visible during casual inspection.
Hidden mold indicated by persistent musty odors without visible growth requires professional detection. Mold often grows in wall cavities behind drywall, underneath flooring, or deep within insulation where it remains invisible until extensive colonization has occurred. Professional remediation begins with thorough inspection using moisture meters, thermal imaging, and sometimes invasive investigation to locate all contaminated materials.
Professional Remediation Process
Certified mold remediation specialists follow established protocols that ensure complete removal and prevent cross-contamination to unaffected areas. The process begins with a comprehensive inspection and moisture assessment, typically provided at no charge. Technicians use moisture meters and thermal imaging cameras to map all water damage and identify mold growth, including hidden contamination.
Containment establishes physical barriers using plastic sheeting and maintains negative air pressure in work areas. HEPA-filtered air scrubbers exhaust air from the contained space while filtering out mold spores, preventing their spread to clean areas of your home. Complete removal involves extracting all contaminated materials—wet insulation, water-stained drywall, mold-covered wood that cannot be effectively cleaned, and any porous materials that absorbed mold growth.
Antimicrobial treatment of affected surfaces kills remaining mold and inhibits regrowth. This includes application of EPA-registered biocides to structural materials that will be retained, such as roof sheathing or wall framing. Industrial dehumidification and air movement equipment dries all affected areas to below 60% relative humidity, the threshold that supports mold growth.
Post-remediation testing verifies successful treatment. Air samples collected in previously contaminated areas are compared to outdoor air and unaffected areas of your home to confirm spore counts have returned to normal levels. Clearance testing provides documentation for insurance claims and ensures your home is safe for occupancy.
Why Choose Certified Specialists
Our team holds licenses and insurance in New York, Pennsylvania, Illinois, Ohio, and Michigan, meeting each state's specific requirements for mold remediation contractors. IICRC-certified mold remediation specialists on our staff have completed comprehensive training in proper remediation techniques, safety protocols, and industry best practices.
We provide 24/7 emergency response for urgent situations involving active water intrusion, extensive visible mold, or structural damage. Our team works directly with insurance companies, providing detailed documentation and estimates that facilitate claims processing. We understand insurance requirements and provide the thorough reporting insurers need to approve claims quickly.
Don't risk your family's health or incomplete remediation. Call (877) 360-5502 for immediate professional inspection and comprehensive mold treatment from certified specialists serving the Northeast and Midwest regions.
Ice Dam and Mold Remediation Costs
Understanding cost ranges helps homeowners budget for necessary services and make informed decisions about professional versus DIY approaches.
Ice Dam Removal Costs
| Service | Typical Cost Range | Details |
|---|---|---|
| Roof snow removal | $250 - $500 per visit | Varies with roof size, pitch, and snow depth |
| Professional steam removal | $800 - $2,400 | Based on ice dam extent and roof complexity |
| Emergency after-hours service | +$300 - $500 | Weekend, evening, and holiday rates |
| Preventive heat cable installation | $400 - $2,000 | Depends on roof length requiring protection |
Average total ice dam removal costs fall between $650 and $2,400, with most homeowners paying approximately $1,200 for professional steam removal of moderate ice dams.
Mold Remediation Costs
| Contamination Extent | Cost Range | Typical Timeline |
|---|---|---|
| Small area (<10 sq ft) | $500 - $1,500 | 1-2 days |
| Medium area (10-100 sq ft) | $1,500 - $3,500 | 2-5 days |
| Large area (>100 sq ft) | $3,500 - $10,000+ | 5-10 days |
| Attic-specific remediation | $1,500 - $4,000 | Typical for ice dam cases |
| HVAC system treatment | $2,000 - $6,000 | Includes duct cleaning and sanitization |
Costs vary based on contamination extent, affected materials, and accessibility of work areas. Crawl space and attic remediation typically costs less than finished living space treatment due to simpler material removal, while structural repairs add to total project costs.
Insurance Coverage
Most homeowners insurance policies cover sudden and accidental water damage, including ice dam-related leaks. Coverage typically includes both the water damage itself and resulting mold remediation, provided the damage occurred recently and wasn't caused by long-term maintenance neglect. Insurers generally deny claims when they determine ice dams resulted from inadequate home maintenance, such as ignoring obvious ventilation problems or allowing gutters to remain clogged.
Document everything thoroughly to support insurance claims. Take photographs of ice dams, interior water damage, mold growth, and all affected areas. Retain receipts for emergency repairs, temporary accommodations if your home becomes uninhabitable, and professional services. Contact your insurance company promptly—many policies require notification within specific timeframes after discovering damage.
Our team works directly with insurance adjusters to provide the detailed documentation and estimates they require. Call (877) 360-5502 to discuss insurance coverage for your ice dam and mold damage.
Cost of Delayed Action
Postponing necessary repairs and remediation dramatically increases total costs. Early intervention costing $1,500 to $3,000 for ice dam removal and minor mold remediation prevents far more expensive damage. Roof replacement required after prolonged water exposure costs $8,000 to $24,000 depending on home size and materials. Structural repairs to rotted framing, damaged sheathing, and compromised roof systems range from $10,000 to $30,000 or more.
Health impacts carry costs beyond simple dollars. Medical treatment for mold-related respiratory issues, particularly for children or family members with asthma, creates ongoing expenses. Reduced home value from documented mold problems can decrease property values by 10% to 20%, potentially costing tens of thousands of dollars when selling.
FAQs: Ice Dams and Attic Mold
How long does it take for mold to grow after ice dam water damage?
Mold can begin growing within 24 to 48 hours after building materials become wet, according to EPA guidelines. Visible mold colonies typically appear within 3 to 5 days. This rapid timeline makes immediate action critical after discovering ice dam leaks—the longer water-damaged materials remain wet, the more extensive mold colonization becomes.
Can I remove ice dams myself safely?
Small ice dams can be managed using roof rakes operated from the ground and calcium chloride drainage channels. However, never climb on an icy roof—falls from ice-covered roofs cause serious injuries and fatalities each winter. Professional steam removal costing $800 to $2,400 provides the safest and most effective solution for substantial ice dams. DIY ice chipping with hammers or other tools damages shingles and often causes more expensive repairs than professional removal.
Does homeowners insurance cover ice dam damage?
Most homeowners insurance policies cover sudden water damage from ice dams, including resulting mold remediation, provided the damage wasn't caused by long-term maintenance neglect. Insurers evaluate whether adequate insulation, ventilation, and gutter maintenance were maintained. Document problems immediately with photographs, notify your insurance company promptly, and call (877) 360-5502 for professional assessment that provides the documentation insurers require for claim approval.
At what temperature do ice dams form?
Ice dams form when attic temperature exceeds 32°F (causing snow melt) while eaves remain below 32°F (causing refreezing). Outside air temperature typically ranges between 20°F and 35°F during ice dam formation—the key factor is the temperature difference across your roof caused by heat loss into the attic, not the absolute outdoor temperature.
How much does attic mold remediation cost?
Typical attic mold remediation ranges from $1,500 to $4,000 depending on contamination extent and attic accessibility. Small areas under 10 square feet may cost $500 to $1,500, while severe cases with structural damage can exceed $10,000. Costs include containment, removal of contaminated materials, antimicrobial treatment, drying equipment, and verification testing.
Can I just paint over water stains on my ceiling?
Painting over water stains without addressing the underlying problem is ineffective and potentially dangerous. Water stains indicate moisture that likely caused mold growth behind surfaces. Before painting, you must identify and stop the water source, allow complete drying of all materials, remediate any mold growth, and verify that moisture levels have returned to normal. Call (877) 360-5502 for proper assessment before attempting cosmetic repairs.
What's the difference between ice dams and icicles?
Icicles are simply frozen water drips and don't always indicate problems, though large icicles often signal the temperature differential that creates ice dams. Ice dams are thick ridges of ice along roof edges that trap water and prevent drainage. While icicles may form anywhere water drips, ice dams specifically develop at roof edges where melting snow water refreezes. Ice dams cause damage; icicles are primarily a warning sign.
How do I prevent ice dams in my historic home?
Historic homes in New York and Pennsylvania often have limited attic space and architectural features that complicate insulation. Focus on maximizing insulation in available spaces using high-R-value per inch materials like closed-cell spray foam. Seal all air leaks meticulously, as this provides the most critical benefit. Add exterior ventilation through inconspicuous soffit and ridge vents if interior ventilation is impossible. Consider professionally installed heat cables as a last resort for particularly problematic roof sections while working on long-term insulation improvements.
Is black mold common from ice dam damage?
Dark-colored mold, including Stachybotrys chartarum (commonly called black mold), frequently grows on wet cellulose materials like drywall and paper-backed insulation following water intrusion. Black mold produces mycotoxins that pose health risks. If you observe black mold covering more than 10 square feet, or if anyone in your household experiences respiratory symptoms, call professional remediation specialists immediately at (877) 360-5502. Small areas under 10 square feet may be cleaned carefully using proper safety equipment, but larger contamination requires professional treatment.
How long should I run dehumidifiers after water damage?
Run dehumidifiers and air circulation fans continuously for a minimum of 3 to 5 days after water extraction, maintaining relative humidity below 50%. Professional drying equipment accelerates this timeline to 24 to 48 hours in most cases. Continue until moisture meters confirm complete drying—materials should reach 15% moisture content or less. Don't rely on visual assessment; moisture remains inside materials even when surfaces appear dry.
Winter 2026 Action Checklist for Northeast & Midwest Homeowners
This Week
☑ Inspect your attic for current water damage, stains, or mold growth
☑ Check roof edges for icicles or visible ice buildup
☑ Measure attic insulation depth (should be 16-20 inches)
☑ Look for frost or condensation on attic surfaces, rafters, or exposed nails
☑ Test smoke and carbon monoxide detectors while in attic
Before Next Snowstorm
☑ Clean gutters and downspouts completely, removing all leaves and debris
☑ Purchase a roof rake if you don't currently own one
☑ Locate attic access for quick post-storm inspection
☑ Store emergency leak supplies (buckets, tarps, towels) in accessible location
☑ Save (877) 360-5502 in your phone contacts for emergency mold remediation
After Heavy Snowfall (6+ inches)
☑ Remove snow from lower 3-4 feet of roof using roof rake from ground
☑ Check attic within 24 hours for any signs of water leaks
☑ Monitor indoor humidity levels (maintain below 50% relative humidity)
☑ Inspect ceiling surfaces in top-floor rooms for new water stains
☑ Document any problems with dated photographs for insurance purposes
This Spring (March-April 2026)
☑ Conduct comprehensive attic inspection for winter damage
☑ Schedule professional roof inspection to identify needed repairs
☑ Seal any air leaks discovered during winter
☑ Upgrade insulation if current depth is inadequate
☑ Plan and budget for ventilation improvements before next winter
If you discover any signs of water damage or mold growth, don't wait until spring. Call (877) 360-5502 today for immediate professional inspection and treatment.
Protect Your Home This Winter
Ice dams create a direct pathway from winter snow on your roof to mold growth in your attic through a process that unfolds in days, not weeks. Heat loss melts snow, refrozen water blocks drainage, trapped moisture penetrates roofing materials, and mold colonizes damp attic spaces within the EPA's 24 to 48-hour timeline. For homeowners throughout New York, Pennsylvania, Illinois, Ohio, and Michigan, where heavy snowfall and temperature fluctuations create ideal ice dam conditions, prevention through proper insulation, ventilation, and air sealing provides the most effective protection.
The comprehensive approach addresses root causes rather than symptoms. Maintaining your attic as a cold, dry space prevents the snow melt that initiates ice dam formation. When ice dams do develop, immediate professional removal stops water intrusion before extensive mold growth begins. If mold contamination has already occurred, certified remediation eliminates health risks and prevents structural damage from progressing.
Regular winter monitoring, prompt response to warning signs, and investment in proper preventive measures protect both your largest financial asset and your family's health. The relatively modest cost of professional insulation, ventilation improvements, and ice dam removal pales in comparison to the extensive expenses of roof replacement, structural repairs, and comprehensive mold remediation that result from neglecting these problems.
Don't wait for minor ice dam problems to become major mold crises. Call our certified mold remediation specialists at (877) 360-5502 for 24/7 emergency service throughout New York, Pennsylvania, Illinois, Ohio, and Michigan. We provide inspection, work directly with your insurance company, and deliver the professional expertise your home and family deserve.